Hello lovely readers! Today I’m sharing a really cool technique that you can use on any block or brick surface. Armed only with some paint and plaster I took our garage cinder block wall from drab to dapper.
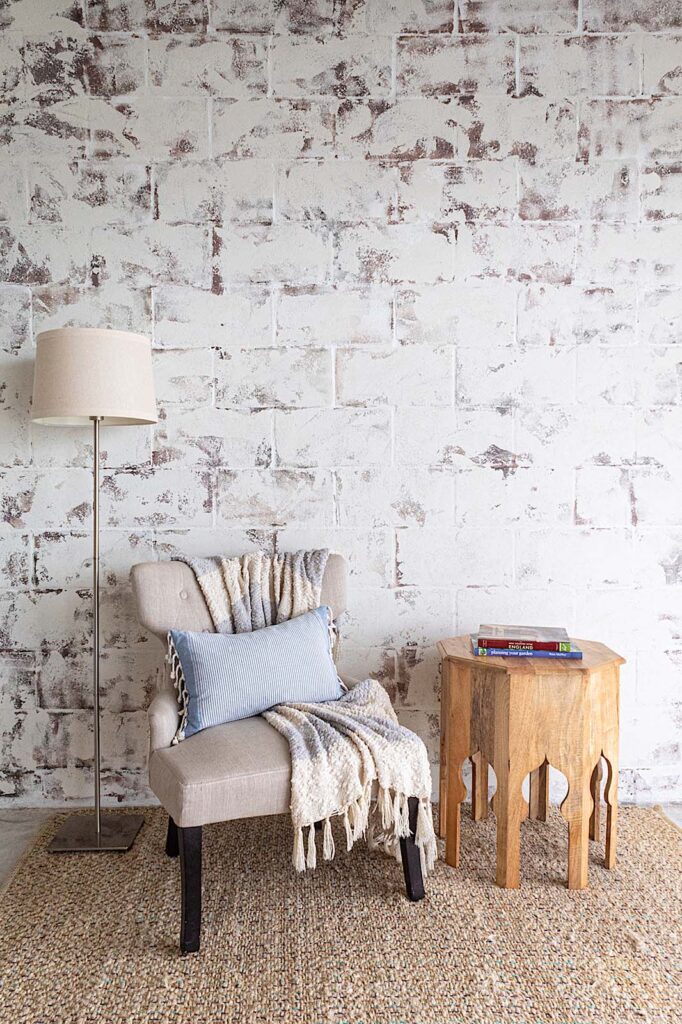
I needed a nice backdrop for staging my furniture renovations when I photograph them for the blog. I wasn’t sure how it was all going to come together, but I had an idea in my head. I really love how it came out and the wall is now ready for the limelight.
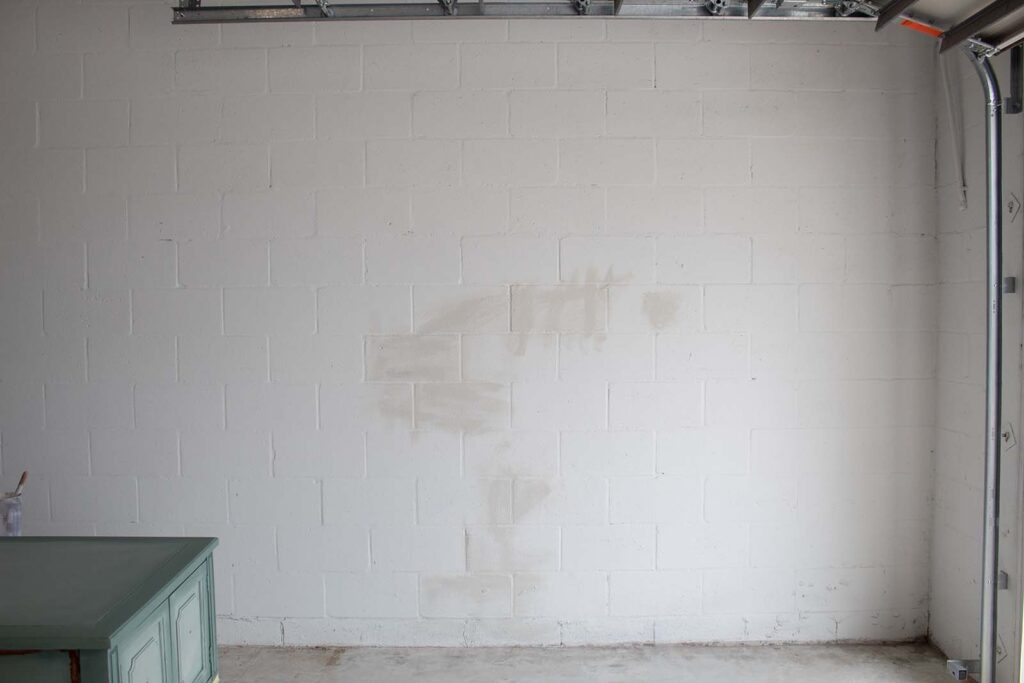
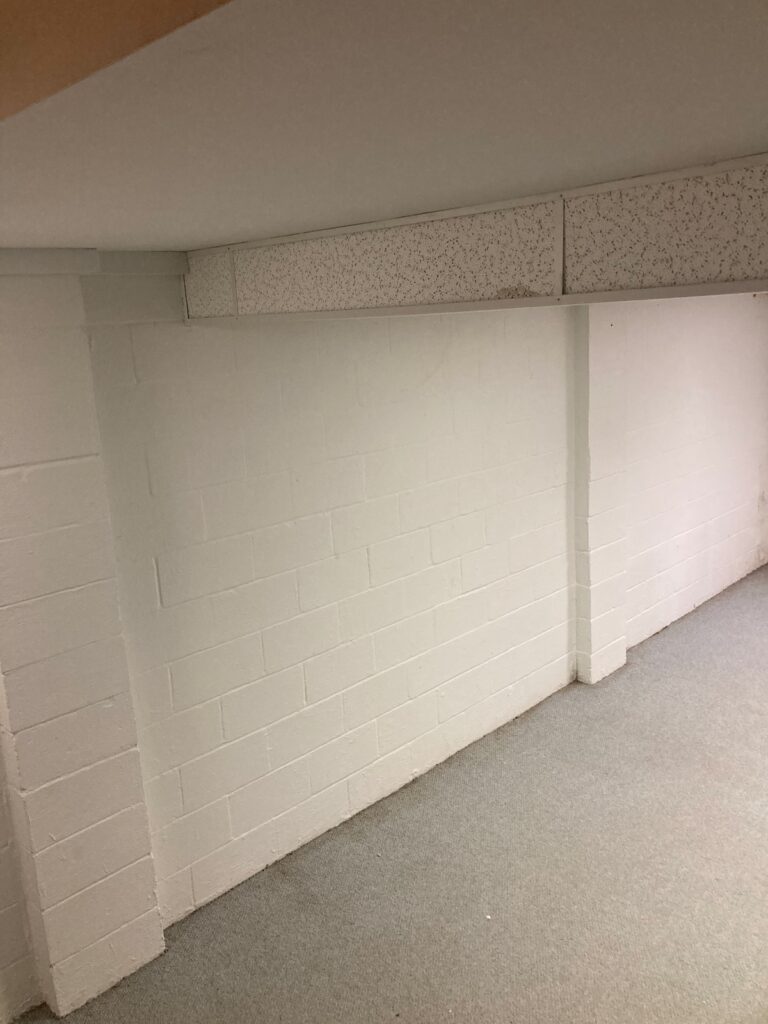
Take a look at how the wall looked before. It was originally painted white by our painter when we built the house. You’ll notice a few spots of my cream paint that I started applying…I caught myself just in time to snap a before picture.
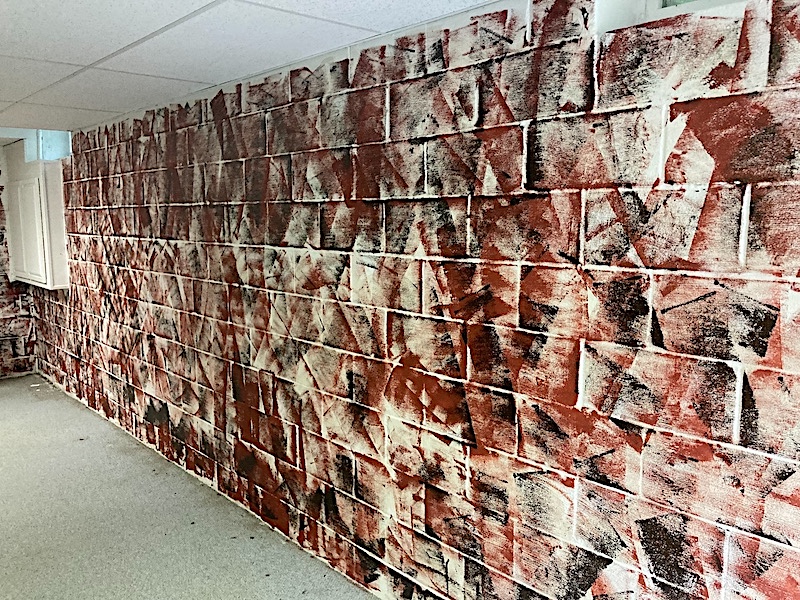
I chose three paint colors for my layers. Since my walls were already painted white, the white would actually act as another color layer. If your cinder block walls are not painted and are likely gray in color, then the gray undertones will make your end result look a little darker, but surely just as beautiful.
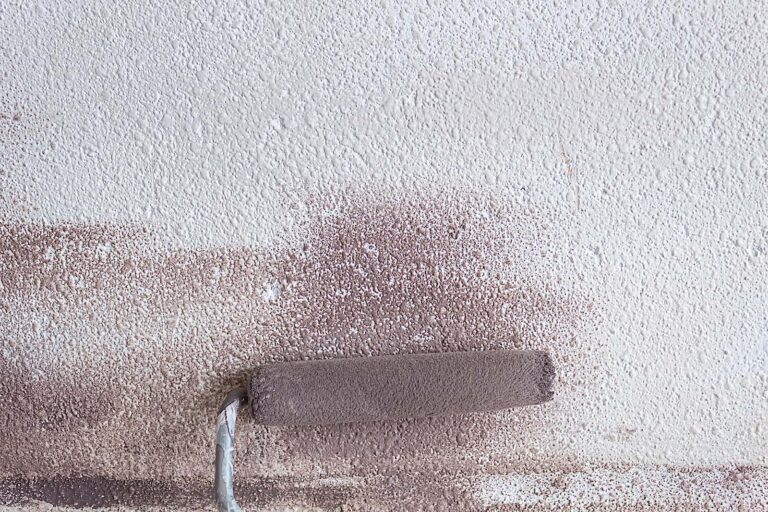
Here I am using my mini roller to apply the first color, a creamy off white (Glidden’s Meeting House White). I rolled in all directions all over the wall careful to leave white parts exposed. You are not aiming for full and uniform coverage with this technique, but rather sloppy and sporadic strokes.
2. Add Your Second Color
I made a maroon color by mixing some brown, black and red paint I had. I applied it as my second color. I rolled it on also sporadically going over some of the cream as well as leaving some of the cream and white parts exposed.
All the paints I used were leftovers of latex paint I had. I don’t know that I’d use chalk paint for this finish. Because to make chalk paint move and go a long way you use water. Either by thinning the paint beforehand or misting as you paint.
If paint is watered down, it will seep into all the nooks and crannies of your blocks reducing the textured effect. If you dry brush it on (no watering) you will get a nice textured effect but you will quickly use up your chalk paint on such a large surface. I think latex worked out well for this project.
3. Add Your Final Color
For my final color I used Valspar’s Carbonized, an off black color.
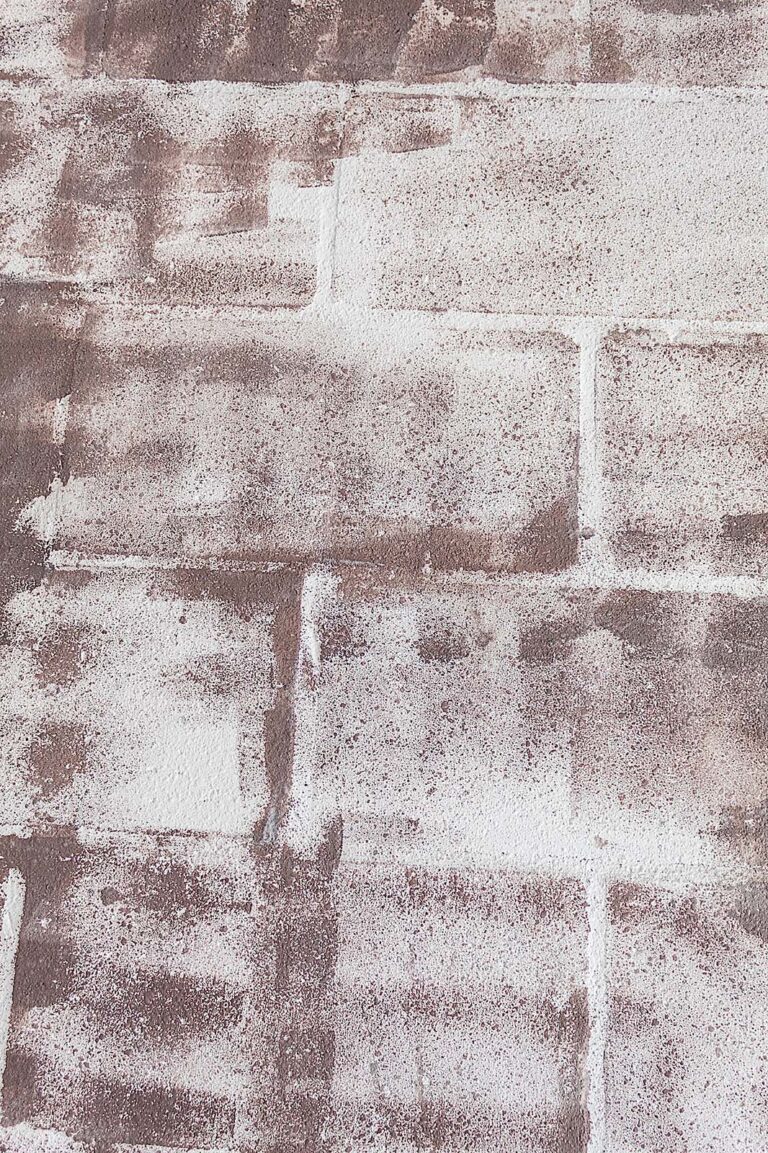
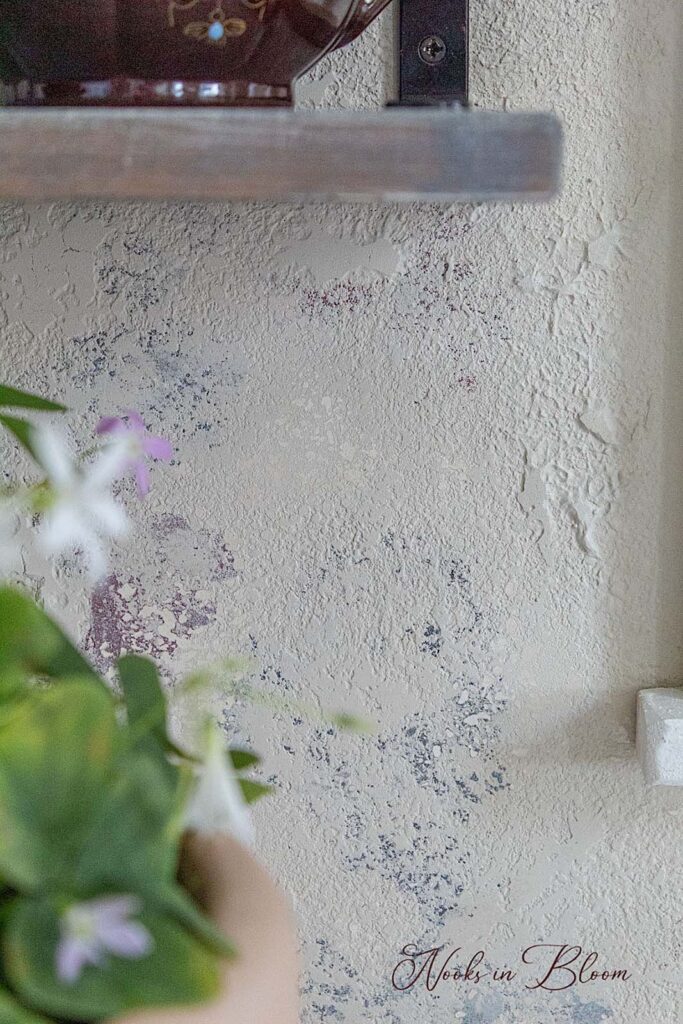
As you roll over each prior layer of color and with the texture of the cinder block, you start to achieve a gorgeous mirage of depth and colors. There really is no wrong way of doing this. Because the paint will be only slightly showing after you apply the plaster, you can go crazy with your rolling strokes! I first tried this technique with a paint brush but I didn’t like the look I was getting. With only a minimal amount of paint on the roller I was able to beautifully accentuate the wall’s texture.
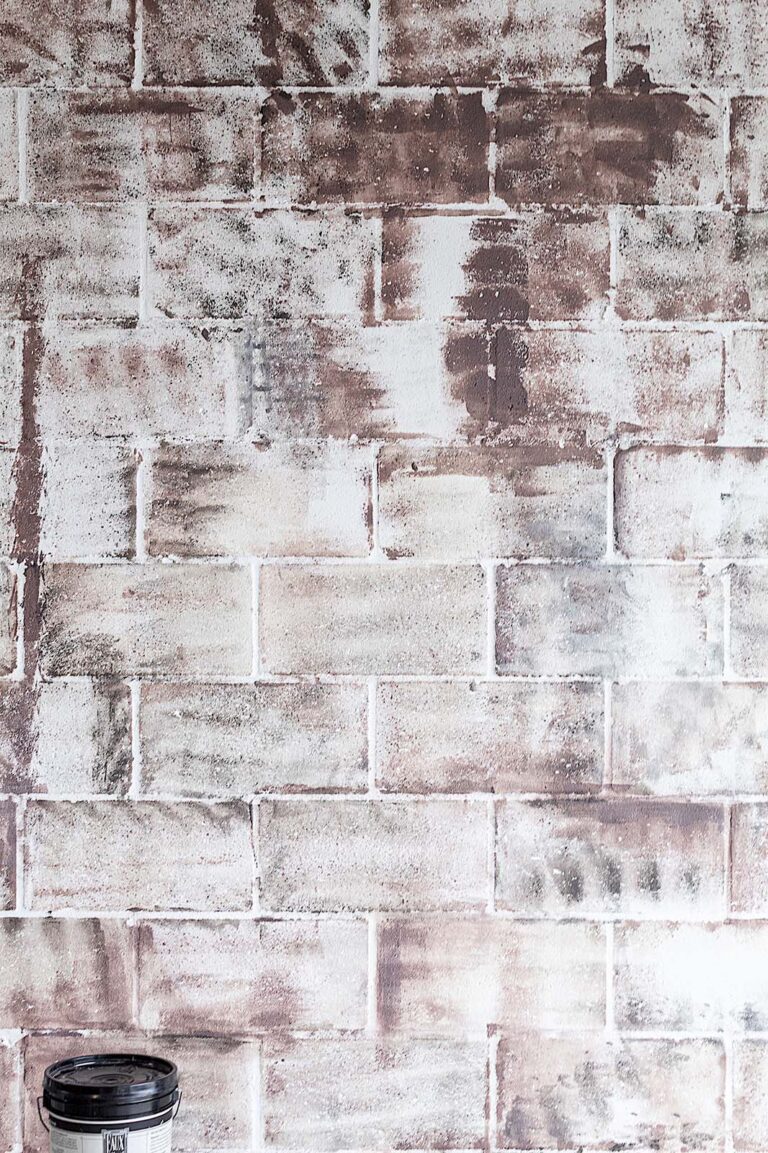
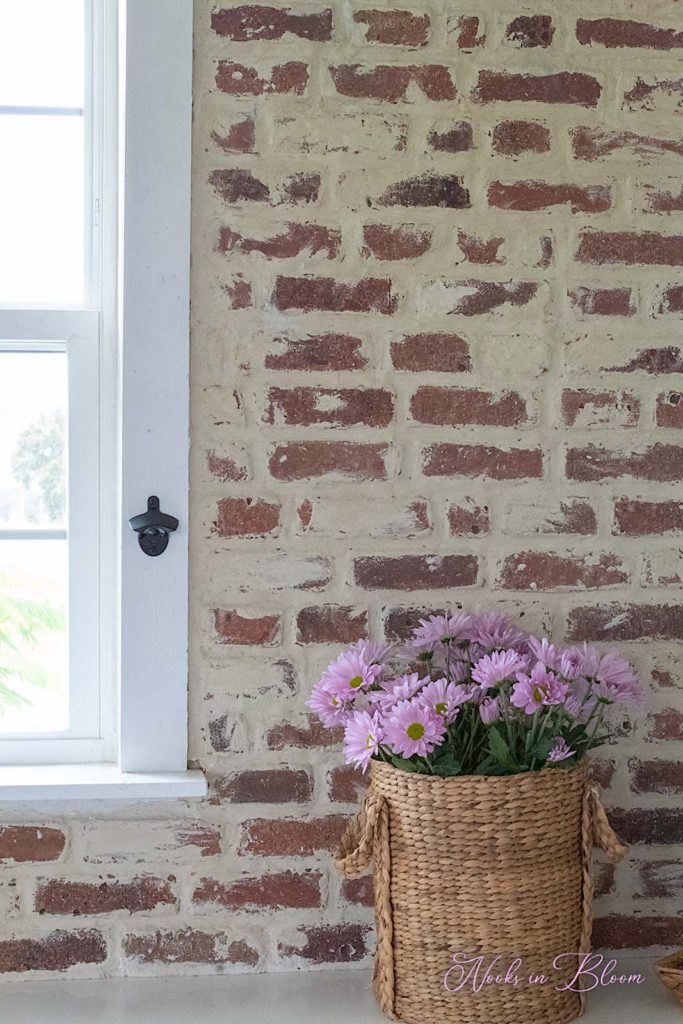
Here is the wall after the 3 paint colors. Pretty wild huh? If you really wanted a funky industrial look, you could stick with this. But I wanted a more subtle and neutral canvas for my background with an exposed brick look.
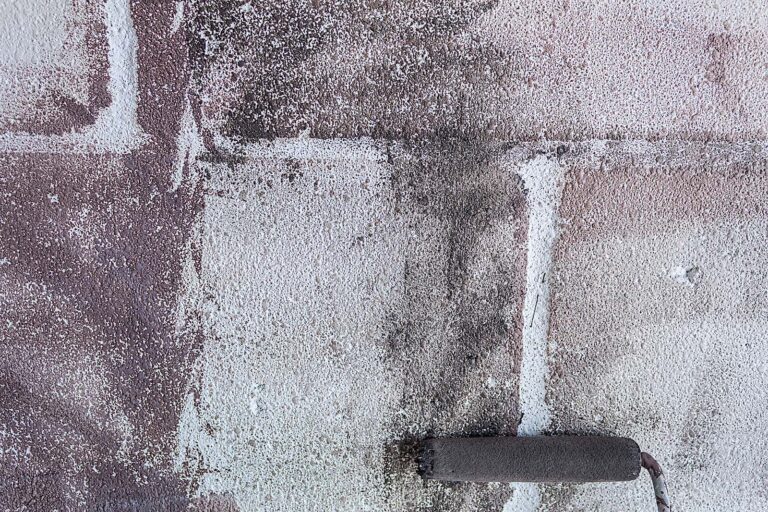
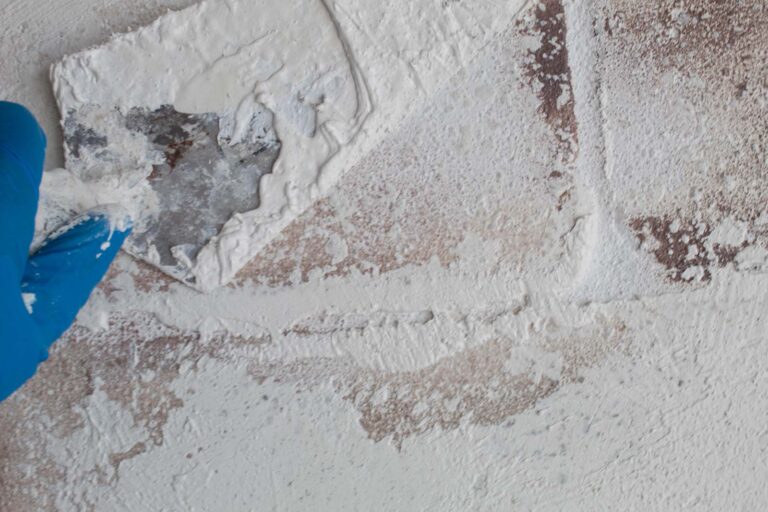
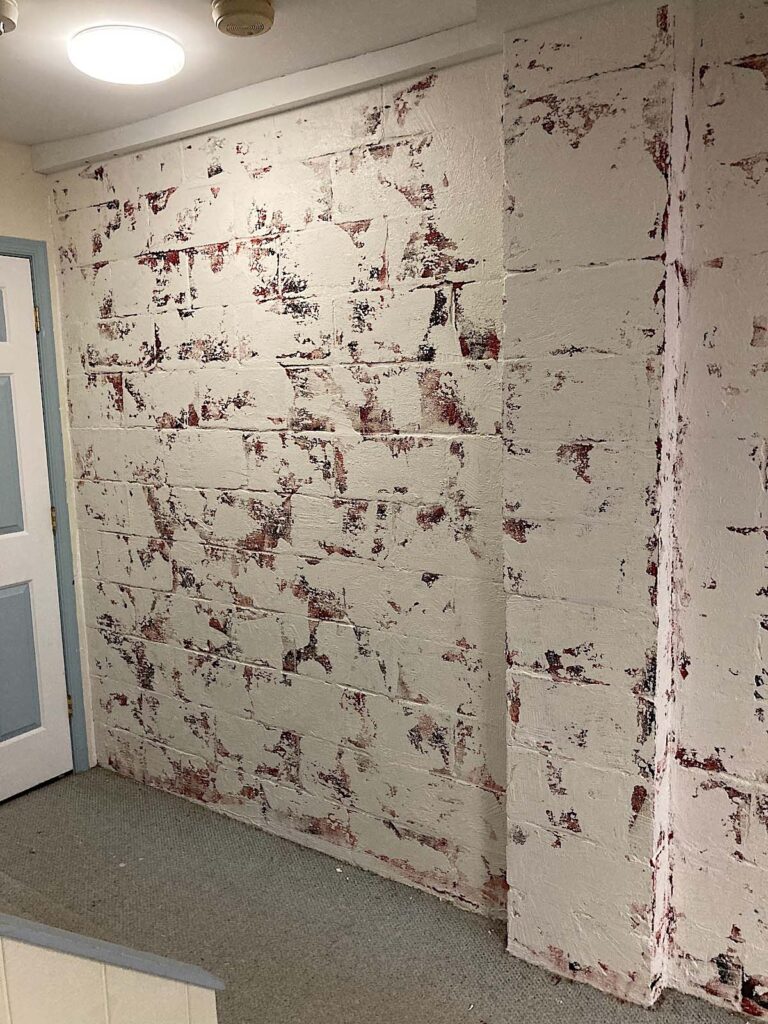
Last Step: Add Your Plaster
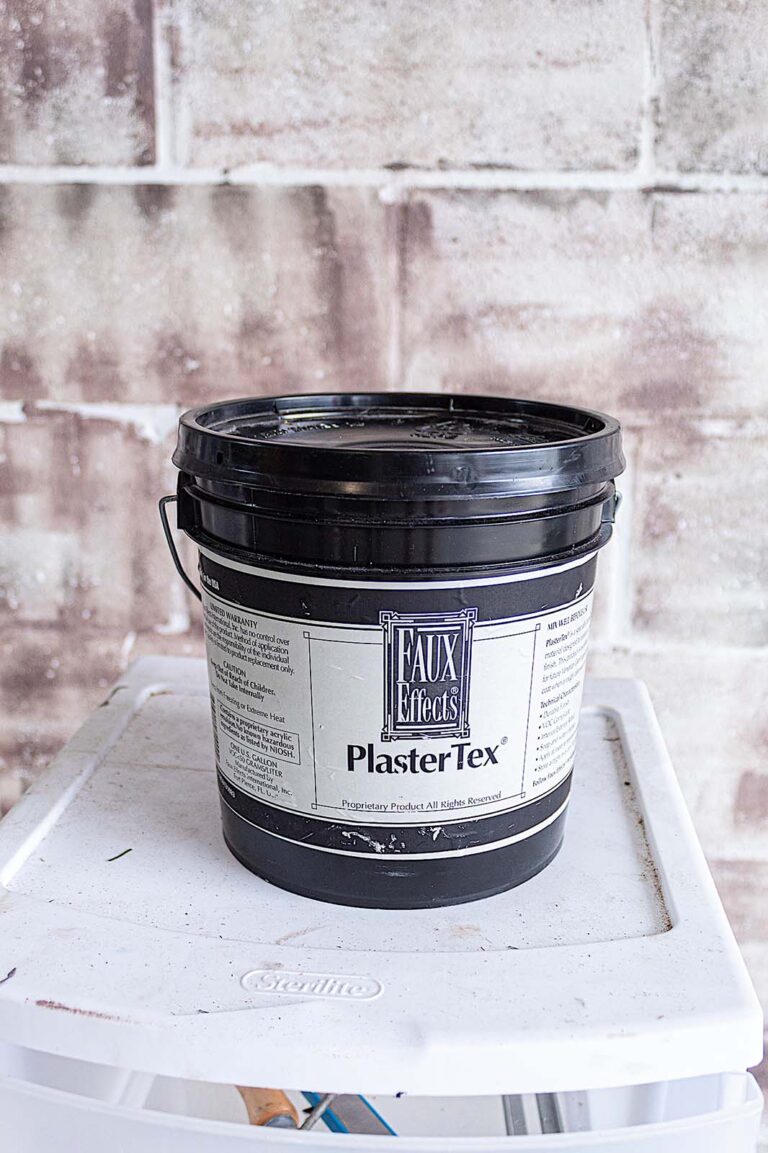
I had originally bought Plaster Texto create a German Schmear brick wall in our kitchen. I honestly was a little scared to use the PlasterTex on the brick since I had never worked with it. So instead I used mortar and it came out really well. And the upside was I now had a gallon of PlasterTex to play with on our cinder block wall. I wasn’t so worried about messing things up in our garage!
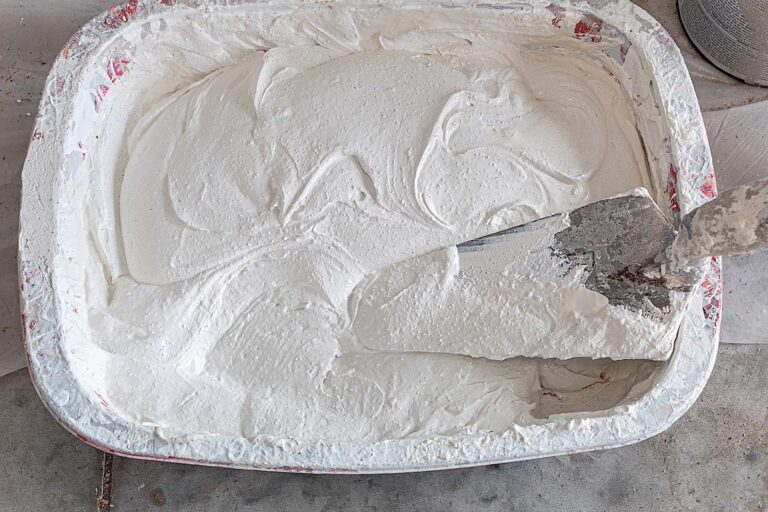
Once I opened up the PlasterTex I loved the consistency. It was creamy and textured at the same time. Prior to application I tinted it by mixing in about half a cup of the beige paint per half a gallon of the plaster. The plaster is like cake batter so it was easy to mix in the paint by using my trowel. I folded in the paint over and over until it was completely blended in with the plaster.
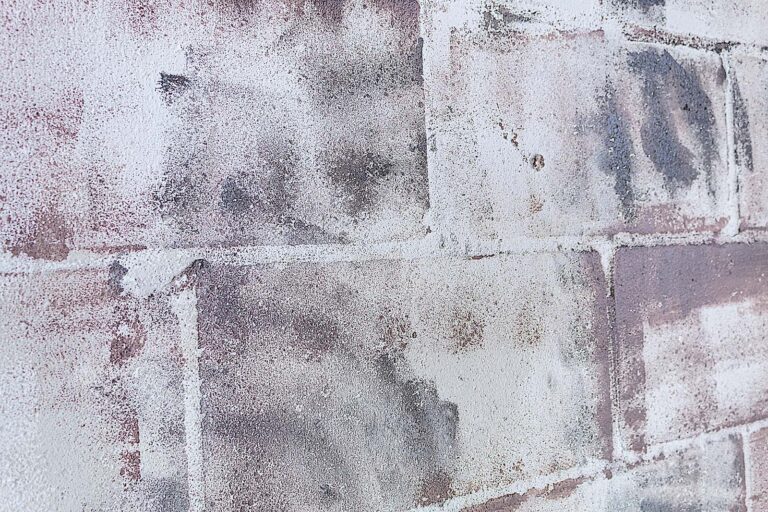
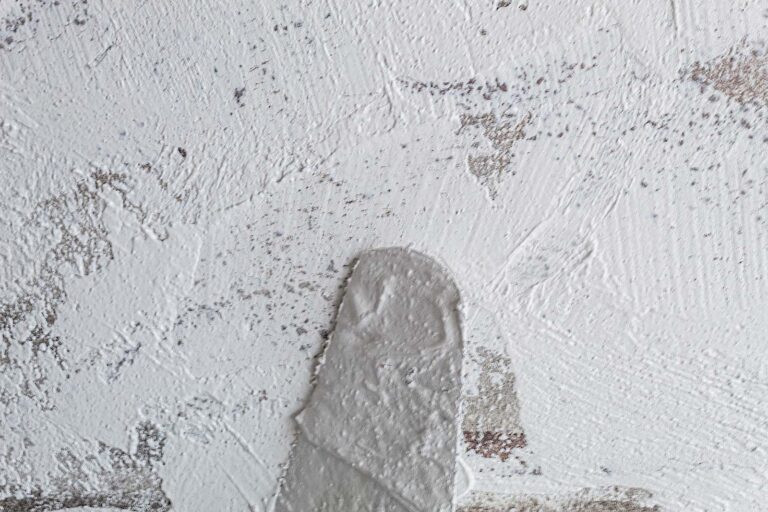
The technique I used for the finishing details was to apply layers of the plaster in swooping motions with my trowel. Leaving parts where the colors of paint are exposed is what’s going to give your wall a really neat smeared and exposed brick look.
I was careful not to cake the plaster on as I did not want a heavy look. I played with it and went back over certain parts skimming the plaster.
Occasionally step away from the wall to see if you like how it’s looking. You can leave more color exposed too if you like. Below is a video demo of the plaster application process.
Video Demonstration
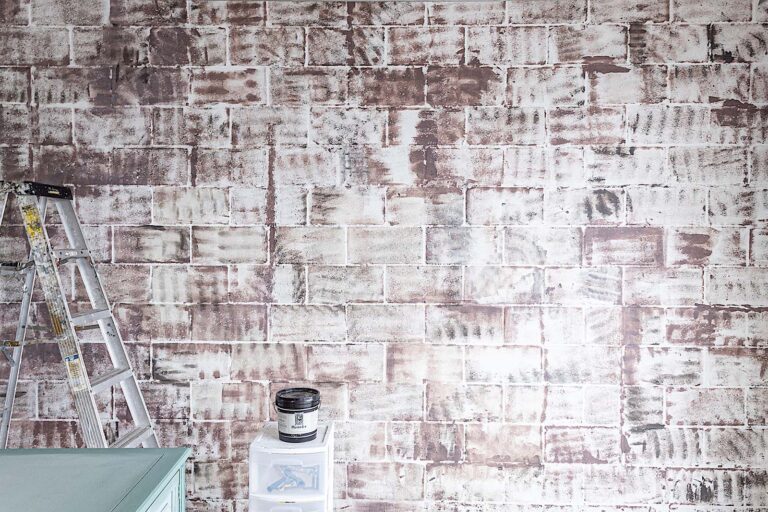
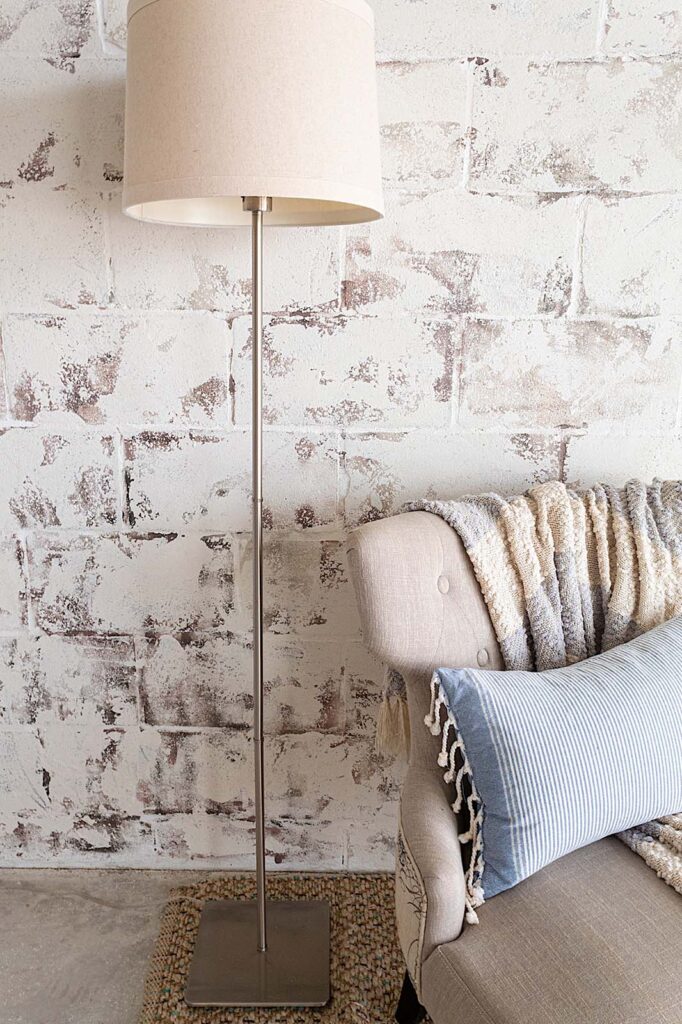
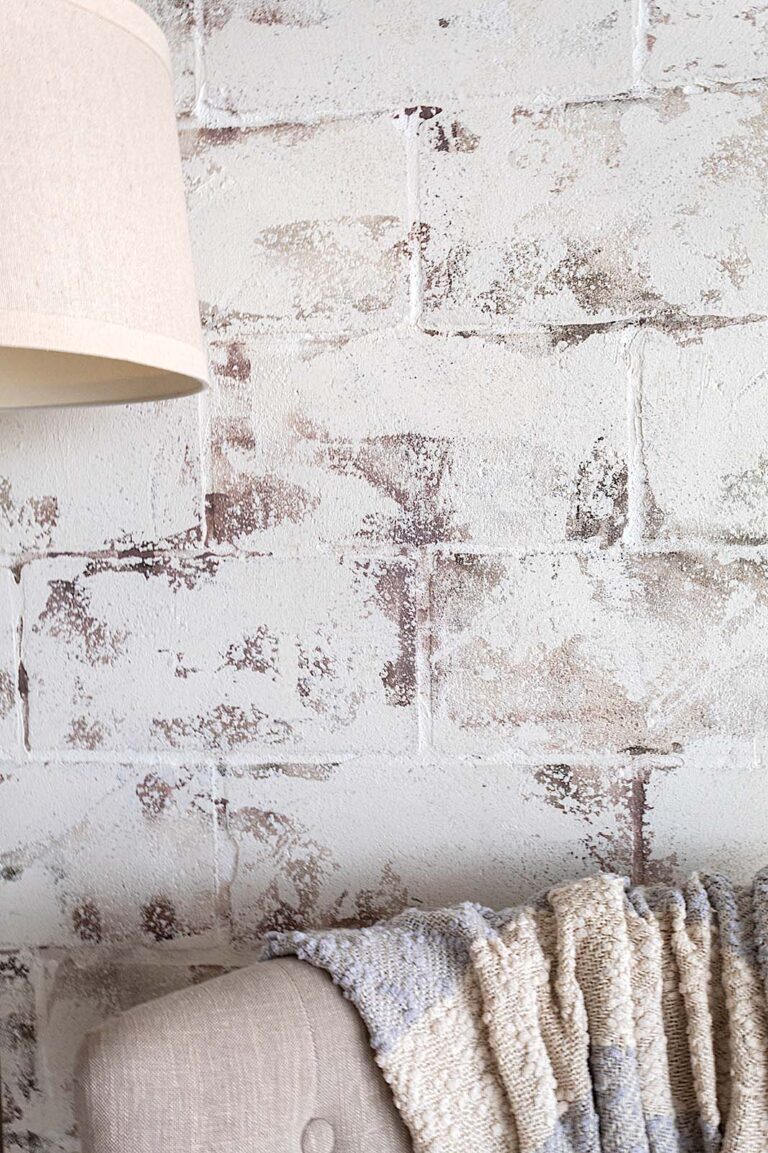
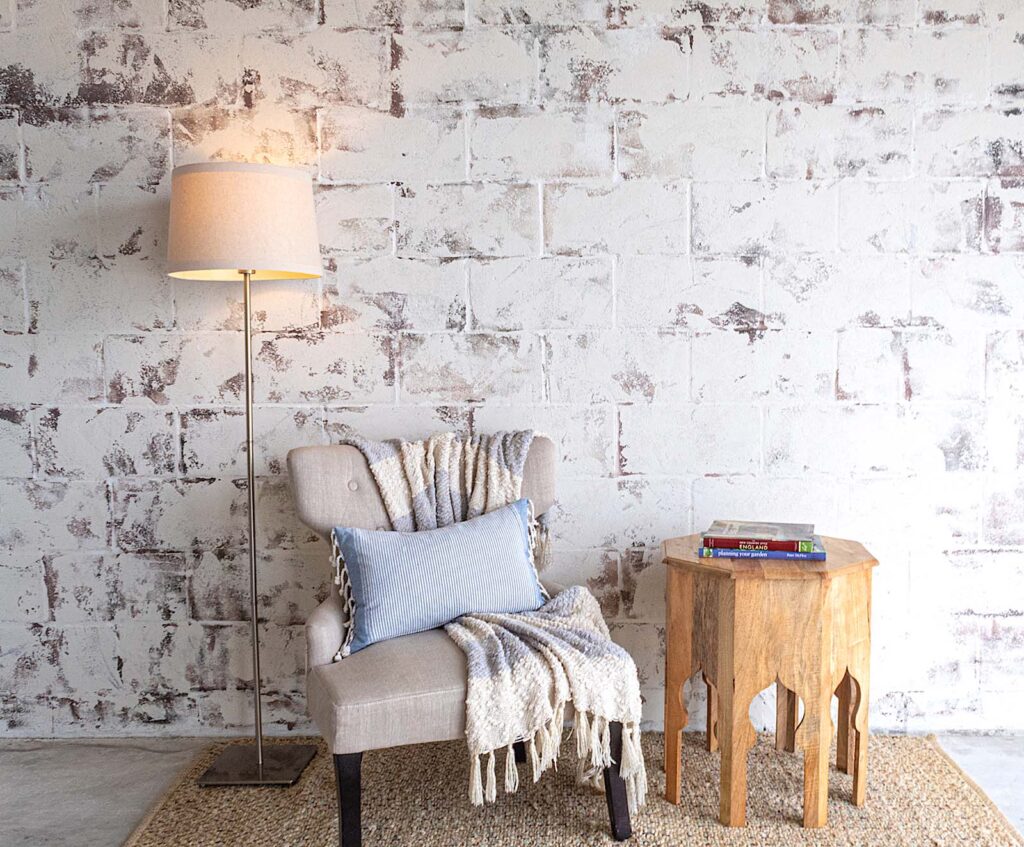
And that is it! What do you think? Isn’t it beautiful! This part of our garage looks like a cool studio now…I try hard to ignore the messy clutter everywhere else.
This was a really easy way to make a bland wall look amazing and change the whole aesthetic of the space. It’s the perfect backdrop for several design styles, from rustic chic to boho to modern industrial.
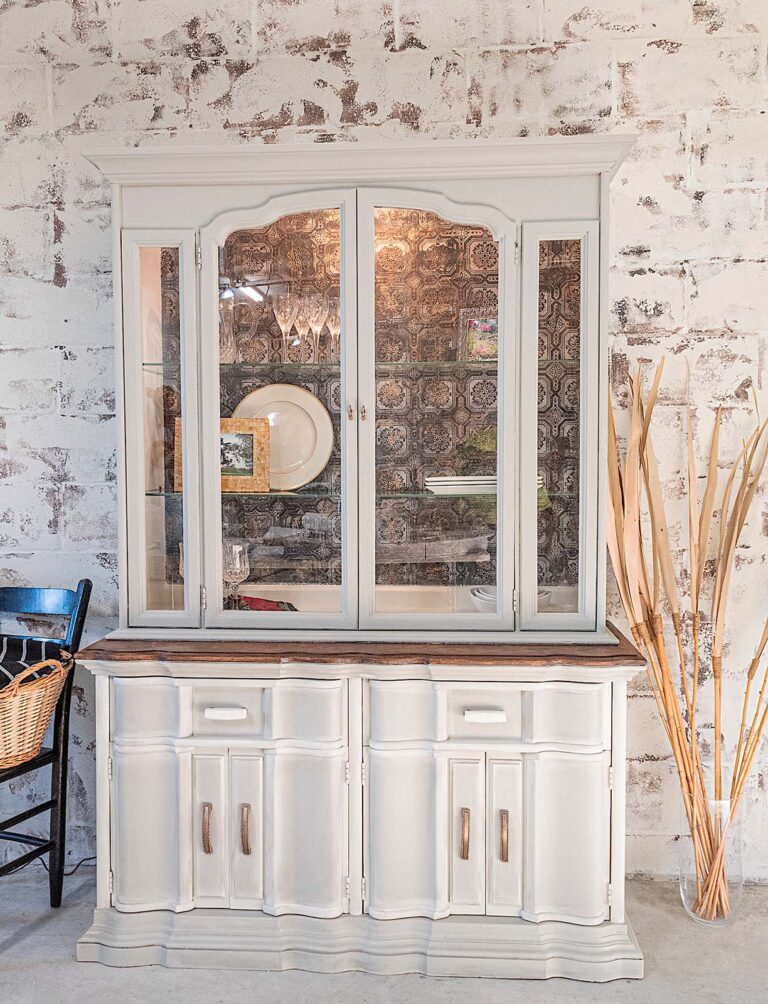
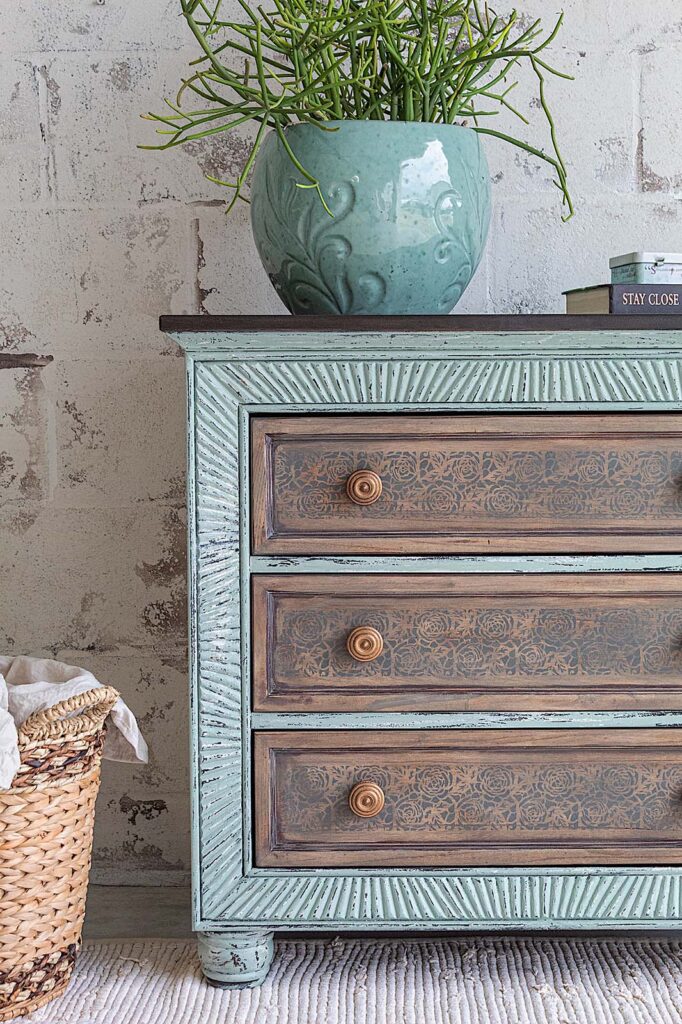
And I’ve made great use of it as my staging wall for my furniture renovations. Take a look.
China Hutch Renovation
If you enjoyed this post, you’ll love how I renovated our kitchen wall. I used paint using and Saltwash® to create a stone look accent wall. It came out so dreamy! Read more >>.
Kitchen Wall
CHECK OUT WHAT THIS READER DID!
“I followed your directions step-by-step and used oops paint from the store. I was nervous at first since my paint went on heavy and looked like graffiti, but once I put the plaster on, I couldn’t stop smiling. Loving my new look. We are doing 3 out of 4 basement walls like this and have found that one gallon of PlasterTex went about 100 sq ft. Thank you for the tutorial, without it, I never would have thought to try this at home.” ~Jennifer Browning
It makes me so happy when others are empowered to create their own art! Thank you for stopping by friends! I hope you enjoyed this tutorial. Be sure to SUBSCRIBE at the bottom of the page. I will be sharing some more exciting projects soon!
My house has cinderblock walls in the bedrooms. I want to do something similar to what you did, but I do not want them to look so white. My son would like his room to be gray and a deeper blue. Any suggestions on what I can do with those two paints with the brick and mortar to make it look more distressed on the cinderblock?
Can I add paint to the brick and order mix to give it a different tent or do I have to use certain paints or powder mix?
Hi Stefani, I’m so sorry for the late reply! That sounds like a cool palette for your son. I think you could definitely work with this.
You can definitely play with tinting the mortar. If I understood correctly about using brick and mortar mix to add some texture and layers over the blocks. There are usually white and gray colors of mortar. You could work with the existing gray and tint the white with some blue perhaps. You may need to create various hues of gray, some lighter and some darker, and the same for the blue. That way you can create a few layers for an exposed look. You can even apply one layer of the mortar, then paint over it some patches of grays and blues and maybe add some hints of cream or white to create more contrast, and finally come over everything with another layer of mortar in the color you want to be the dominant color. You leave parts of the undercolors exposed to give it character and contrast. I’m not sure if this helps any, but I wish you all the best with this fun project!
What an incredible transformation! It’s inspiring to see how much creativity and effort you’ve poured into turning a simple cinder block wall into such an attractive and functional feature. I appreciate the step-by-step breakdown and the emphasis on prep work—it’s so helpful for DIYers like me who want to tackle similar projects.
As someone interested in retaining walls, I’m curious—do you think the techniques you used here could be adapted for a functional retaining wall that also serves as a decorative focal point? Are there any specific reinforcements or considerations you would recommend for retaining walls to ensure both strength and aesthetic appeal?
Hello and I apologize for my delay in responding!
Thank you for your kind words. I’m so glad you appreciated the post. As far as the structural aspect for reinforcing retaining
walls, I’m out of my wheelhouse, so it’s best I refrain from giving any advice. However, in regards to the aesthetics, if the
materials being used are of similar nature to cinder block, I would venture to say that yes, you could apply the same techniques.
Depending on the exposure to weather elements, you may need to add a top coat of exterior proof sealant.
Hi, I’m not sure if joint compound (https://amzn.to/3XrZZX1) could be a suitable alternative. It may at least add a level of texture depending on how you apply it. I know the plaster tex is a little pricey but it does tend to go a long way. Good luck with your project!
Love the wall. My wall is already painted a dark red, but would like to texture it like your wall. Any advice about the paint colors? Would you paint the wall another color to start? Or leave it and work with the red? Thanks.
Thank you Nancy for your kind words! I think you can definitely work with the red. With texture through paint layering it’s all about creating contrast. So I would add in some other colors in blotches alongside your red, maybe some lighter tones, like grays or light greens, whatever you like and then finish with your top layer in a lighter color like an off-white. If you use a top color that is dark also like your red, it’s going to be harder to get that exposed brick look as you risk everything just blending together. Hope that helps and good luck!
Great concept, fabulous look!! Thank you so much for sharing! I have just finished my third paint color and plan on painting one more before adding the texture. I am going to try the joint compound for the smear. I’ll let you know how it turns out.
Yes, it is similar to a German Schmear or exposed brick wall. Thank you for sharing this pin. Her project came out dreamy! I did something similar on our kitchen wall (https://www.test.nooksinbloom.com/kitchen/). It’s one of my favorite projects in our house. Thank you for your comment Allison!
Hi Genene!
I used mortar for the exposed brick finish on our kitchen wall. I am not sure how it will look on cinder block but it seems to me since the blocks have texture like bricks that it could turn out really beautiful with the layering technique. If you have an inconspicuous area you could test it on, that might be helpful to make sure you like the results. I typically play with techniques until I get the results I like. Hope this helps. Good luck with your project!
Hi! I don’t see why not. I would just double-check that the products you use are for outdoor use so they withstand the weather elements. But the aesthetic should look the same since it is cinder block also. Sounds like a beautiful idea! Good luck.
Hi! I absolutely love what you did to this concrete wall and am hoping to do the same to our basement wall. What type of paint did you use? A latex paint-and is it a satin or flat finish?
Thank you!
Hi Hillary! It was just some left over latex paint I had. And yes, the sheen was satin, but probably flat would work just as well for this look.
That is exciting to hear of your project! I’d love to hear how it turns out. Good luck! ~Jessica
I love, love, LOVE this look! My husband and I are looking for ways to up-do our cinderblock home (built in the 1940’s for the soldiers when they returned from war). I was wondering, has anyone tried this with exterior walls? We love the look, and the price can’t be beat when compared to stucco, but I’m nervous about the elements. Would this brand hold up with snow/water? If in a garage, or basement, how does it hold up to dampness?
Great job on this wall! It’s inspiring to know you CAN make cinderblock look good 😄
Hi Hayley! Thank you for your kind words! It really was a fun project and I was really happy with how it made such a difference on the wall. I don’t have the answers to your questions as I haven’t used this product on the exterior. But I LOVE the way you think. That is a creative finish for the exterior! I will tell you so far in our garage it has held up well to moisture. We don’t have air conditioning in this space and we do get a quite a bit of rain in Florida. However, I’ve only had the wall finished for a little over a year. Not sure the long-term results…I will try to reach out to the company with your questions and see what they tell me!
The company shared the following. I hope it is helpful! Good luck with your project.
Plastertex is an interior rated product only. We have exterior rated textures also. They would be Aquastone and Fauxcrete.
Both on http://www.fauxstore.com
Beautiful! I’ll be trying this on the cinderblock in my garage in the upcoming months. Been trying to find a solution to making the wall more attractive, and I think this is it. Will let you know how it turns out. Thanks!
Hi,
I absolutely LOVE this look and want to try to recreate it on 1 wall in my basement but I am wondering if you think it could be possible to get that same look using a white wash instead of purchasing the plaster. I cannot find the plaster anywhere except for the website you linked and it seems like a lot of money. Also wasn’t sure how much I would need size wise. Anyways, thanks for the inspiration and I hope that mine turns out as cool as yours is!!
Hello! Yes, this plaster unfortunately is on the pricey side. I just happened to have it because I had originally bought it for another project. I don’t know that a white wash (if you meant with paint) would achieve a similar look. Because of the plaster’s texture and thickness, it helps create dimension and depth needed to “expose” the underlayers of paint. I believe I used a little over half a gallon for this one wall. You may want to try a cheaper plaster. There is a second option I put in the materials list. Or, another option might be to use some white mortar (you may want to tint it to your liking). I used mortar to create our exposed brick wall/washed look on our kitchen wall and it came out very cool. Not sure if this helps you much! Good luck with your project. I’d love to hear how it goes!
Hi! I did not try whitewash. Maybe something you could try out in a small area first to see if you get similar results. I’m not sure if whitewash would give you the same level of texture though.
I love it! I have been going crazy trying all kinds of different ideas to cover up cinder block walls in my retail location. Every wall. I need a wall to photograph rooms . I cannot wait to try this!!
Hi and thank you! Sounds like you have a nice size project on your hands but I’m sure it will look amazing once it’s all done. The good thing is it’s a super fast and fool proof technique. And the backdrop is really nice for photography. I wish you all the best with your project. How exciting! Would love to hear how it comes together.


My house has cinderblock walls in the bedrooms. I want to do something similar to what you did, but I do not want them to look so white. My son would like his room to be gray and a deeper blue. Any suggestions on what I can do with those two paints with the brick and mortar to make it look more distressed on the cinderblock?
Can I add paint to the brick and order mix to give it a different tent or do I have to use certain paints or powder mix?
Hi Stefani, I’m so sorry for the late reply! That sounds like a cool palette for your son. I think you could definitely work with this.
You can definitely play with tinting the mortar. If I understood correctly about using brick and mortar mix to add some texture and layers over the blocks. There are usually white and gray colors of mortar. You could work with the existing gray and tint the white with some blue perhaps. You may need to create various hues of gray, some lighter and some darker, and the same for the blue. That way you can create a few layers for an exposed look. You can even apply one layer of the mortar, then paint over it some patches of grays and blues and maybe add some hints of cream or white to create more contrast, and finally come over everything with another layer of mortar in the color you want to be the dominant color. You leave parts of the undercolors exposed to give it character and contrast. I’m not sure if this helps any, but I wish you all the best with this fun project!
What an incredible transformation! It’s inspiring to see how much creativity and effort you’ve poured into turning a simple cinder block wall into such an attractive and functional feature. I appreciate the step-by-step breakdown and the emphasis on prep work—it’s so helpful for DIYers like me who want to tackle similar projects.
As someone interested in retaining walls, I’m curious—do you think the techniques you used here could be adapted for a functional retaining wall that also serves as a decorative focal point? Are there any specific reinforcements or considerations you would recommend for retaining walls to ensure both strength and aesthetic appeal?
Hello and I apologize for my delay in responding!
Thank you for your kind words. I’m so glad you appreciated the post. As far as the structural aspect for reinforcing retaining
walls, I’m out of my wheelhouse, so it’s best I refrain from giving any advice. However, in regards to the aesthetics, if the
materials being used are of similar nature to cinder block, I would venture to say that yes, you could apply the same techniques.
Depending on the exposure to weather elements, you may need to add a top coat of exterior proof sealant.
I wanted to do the plaster tex but it is too expensive what are other alternatives that you know of?
Hi, I’m not sure if joint compound (https://amzn.to/3XrZZX1) could be a suitable alternative. It may at least add a level of texture depending on how you apply it. I know the plaster tex is a little pricey but it does tend to go a long way. Good luck with your project!
Love the wall. My wall is already painted a dark red, but would like to texture it like your wall. Any advice about the paint colors? Would you paint the wall another color to start? Or leave it and work with the red? Thanks.
Thank you Nancy for your kind words! I think you can definitely work with the red. With texture through paint layering it’s all about creating contrast. So I would add in some other colors in blotches alongside your red, maybe some lighter tones, like grays or light greens, whatever you like and then finish with your top layer in a lighter color like an off-white. If you use a top color that is dark also like your red, it’s going to be harder to get that exposed brick look as you risk everything just blending together. Hope that helps and good luck!
Great concept, fabulous look!! Thank you so much for sharing! I have just finished my third paint color and plan on painting one more before adding the texture. I am going to try the joint compound for the smear. I’ll let you know how it turns out.
Yay, that’s exciting! Let me know how it works out with the compound. I’ve had other people ask about it. Thanks for your input Janet!
How did the joint compound work out?
This looks a lot like “German Schmear” often used on the exterior of homes built with brick. Check out this link or search “German Schmere” on Pinterest. https://welivedhappilyeverafter.com/wp-content/uploads/2019/09/DIY-German-Schmear.jpg
Yes, it is similar to a German Schmear or exposed brick wall. Thank you for sharing this pin. Her project came out dreamy! I did something similar on our kitchen wall (https://www.test.nooksinbloom.com/kitchen/). It’s one of my favorite projects in our house. Thank you for your comment Allison!
I bought white thinset mortarc to do my fireplace. Can i use that on the wall in my basement?
Hi Genene!
I used mortar for the exposed brick finish on our kitchen wall. I am not sure how it will look on cinder block but it seems to me since the blocks have texture like bricks that it could turn out really beautiful with the layering technique. If you have an inconspicuous area you could test it on, that might be helpful to make sure you like the results. I typically play with techniques until I get the results I like. Hope this helps. Good luck with your project!
Do you think this can be done on an exterior cinder block wall?
Hi! I don’t see why not. I would just double-check that the products you use are for outdoor use so they withstand the weather elements. But the aesthetic should look the same since it is cinder block also. Sounds like a beautiful idea! Good luck.
Hi! I absolutely love what you did to this concrete wall and am hoping to do the same to our basement wall. What type of paint did you use? A latex paint-and is it a satin or flat finish?
Thank you!
Hi Hillary! It was just some left over latex paint I had. And yes, the sheen was satin, but probably flat would work just as well for this look.
That is exciting to hear of your project! I’d love to hear how it turns out. Good luck! ~Jessica
I love, love, LOVE this look! My husband and I are looking for ways to up-do our cinderblock home (built in the 1940’s for the soldiers when they returned from war). I was wondering, has anyone tried this with exterior walls? We love the look, and the price can’t be beat when compared to stucco, but I’m nervous about the elements. Would this brand hold up with snow/water? If in a garage, or basement, how does it hold up to dampness?
Great job on this wall! It’s inspiring to know you CAN make cinderblock look good 😄
Hi Hayley! Thank you for your kind words! It really was a fun project and I was really happy with how it made such a difference on the wall. I don’t have the answers to your questions as I haven’t used this product on the exterior. But I LOVE the way you think. That is a creative finish for the exterior! I will tell you so far in our garage it has held up well to moisture. We don’t have air conditioning in this space and we do get a quite a bit of rain in Florida. However, I’ve only had the wall finished for a little over a year. Not sure the long-term results…I will try to reach out to the company with your questions and see what they tell me!
The company shared the following. I hope it is helpful! Good luck with your project.
Plastertex is an interior rated product only. We have exterior rated textures also. They would be Aquastone and Fauxcrete.
Both on http://www.fauxstore.com
Beautiful! I’ll be trying this on the cinderblock in my garage in the upcoming months. Been trying to find a solution to making the wall more attractive, and I think this is it. Will let you know how it turns out. Thanks!
Thank you! It really does make an unexpected difference to a block wall. Please do share how it goes! Good luck Janet.
Hi,
I absolutely LOVE this look and want to try to recreate it on 1 wall in my basement but I am wondering if you think it could be possible to get that same look using a white wash instead of purchasing the plaster. I cannot find the plaster anywhere except for the website you linked and it seems like a lot of money. Also wasn’t sure how much I would need size wise. Anyways, thanks for the inspiration and I hope that mine turns out as cool as yours is!!
Hello! Yes, this plaster unfortunately is on the pricey side. I just happened to have it because I had originally bought it for another project. I don’t know that a white wash (if you meant with paint) would achieve a similar look. Because of the plaster’s texture and thickness, it helps create dimension and depth needed to “expose” the underlayers of paint. I believe I used a little over half a gallon for this one wall. You may want to try a cheaper plaster. There is a second option I put in the materials list. Or, another option might be to use some white mortar (you may want to tint it to your liking). I used mortar to create our exposed brick wall/washed look on our kitchen wall and it came out very cool. Not sure if this helps you much! Good luck with your project. I’d love to hear how it goes!
Did you try the whitewash? I was thinking of doing the same thing as I am not comfortable working with plaster.
Hi! I did not try whitewash. Maybe something you could try out in a small area first to see if you get similar results. I’m not sure if whitewash would give you the same level of texture though.
I love it! I have been going crazy trying all kinds of different ideas to cover up cinder block walls in my retail location. Every wall. I need a wall to photograph rooms . I cannot wait to try this!!
Hi and thank you! Sounds like you have a nice size project on your hands but I’m sure it will look amazing once it’s all done. The good thing is it’s a super fast and fool proof technique. And the backdrop is really nice for photography. I wish you all the best with your project. How exciting! Would love to hear how it comes together.